Showing posts with label DIY. Show all posts

September 10, 2014

Quick Fix for Lunch Count

I'm always trying to be tech savvy. The kids love using technology and it is supposed to make our lives easier. Right?

Well, I started the year doing lunch count on the Smartboard. And the kids did love it, but lunch count was taking F-O-R-E-V-E-R!

Kids were bouncing the icons all over the board, moving others icons and resizing things like crazy. It was a mess. Not to mention it took up the only screen/board I had for a morning message to my kiddos. I finally decided to pull the plug and just go to something quick and easy.  Sometimes old school is the best school. LOL.

I marched myself down to Hobby Lobby and picked up four small colored buckets from their party section.


Then while browsing Michael's I found the most adorable felt owl stickies. The answer was obvious.


Lunch Popsicle Sticks. Aren't they cute?

I was so pleased with how they turned out.  It cost me less than $10 to fix my problem and lunch count is back to being quick and easy. Most importantly, I get my screen back!! Whoo hoo!

How do you do lunch count?  Do you go old school or new?  

August 17, 2013

My Back 2 School Party!

Guess what I did this week for some Back 2 School fun?!?

I hosted a Silpada party.  Don't you just love Silpada?  I think every teacher should get a little silver bling for back to school, right? If you haven't heard of it, click here to check out the fall/winter catalog. Oh my gosh... my wish list gets longer every time I look.  Do you have any favorite pieces? Tell me what YOU love.

Anyway.... I've never been the hostess before. This was a first. I had a great time creating things for my theme and putting together my menu. Wanna see?

 Okay. Here we go...


 Sticking with the back to school theme, school supplies were a staple for my table decor.


 The pencil vase was super easy, but I love the way it came out.  I bought the vase at Walmart for less than a dollar and bought 2 packs of 24 pencils.  Then, I busted out the hot glue gun and went to town.  I simply tied the ribbon around the pencils tight and everything was 100% secure.  This pencil vase has a future spot on my teacher desk.  Love, love, love it!


I grabbed this awesome vase at HomeGoods.  L-O-V-E that store! Then, I carefully organized glue, markers, colored pencils and erasers inside as a filler.  The composition notebooks were the perfect way to give the vase even more height!


 This rockin' vase was a total steal at Ross. I unloaded 8 boxes of crayons and called it a day.  This is one of the simplest, and yet one of my favorites. I love all the colors!


Here is the final table set up.  The multi-colored pom-poms came from Walmart and really helped brighten up the table and pull it all together.  Doesn't the pencil vase look adorable with the yellow flowers? 

Now...on to the food. Yum!


Everything turned out really well. Thank you Pinterest for helping my find and locate so many good recipies/ideas! The tortellini skewers were a huge hit and so easy to make! The spinach dip was also really good. It had water chestnuts in it which gave it a really unique and tasty flavor.  Plus, who can say no to FRESH French bread?!  I know I can't. (Click the links to go right to the recipes.)


The vanilla cupcakes were truly my greatest accomplishment of the night.  Ah-maz-ing! The pin said they were the best homemade vanilla cupcakes and they weren't lying!  Click here for the recipe.  You will NOT be disappointed.

Between the food, the company, the jewelry, and several bottles of wine, we had a great time. 

If you happened to fall in love with any Silpada jewelry online and want to order, I would love to add you to my party. Everything ships directly to you. The party doesn't officially close until Monday and I wouldn't say no to more free jewelry.  Like I said... the wish list is pretty long.  LOL. Click here if you want to order! If you run into any snafus, comment below.  :)
 
And on that note...Happy Back 2 School teacher friends!

September 3, 2012

DIY Crate Seats

I finally did it! After two years of staring at these cute crate seats on blogs and then seeing them all over Pinterest, I finally made my own. Whoo-hoo!

First, I read over Lisa's wonderful directions at Learning is Something to Treasure.  She was very specific and I like that she told me exactly what to look for and about how much everything would cost.  It made the materials hunt go much smoother.

Then, I went shopping.  Home Depot was first up on the list.  Do you think I got enough wood?!?


The guys helping me may have misjudged the size of plywood needed to make 5 seats.  I walked out with 19 pieces of plywood perfectly cut for my crate seats for $20. I would have had 20, but they needed a practice one.  :)  Anyone need some wood?

Next, it was off to Hobby Lobby where I picked up my fabric, poly-foam squares, and spray adhesive.


Finally, I want home and got started.  Here is the final product. Cute, huh?


I'm really excited about fabric I chose.  It is actually cotton duck...something I didn't even know existed until this weekend.  Basically, it is canvas.  I'm hoping it will hold up through the year a bit better.

I can't wait to get them into my classroom and start using them.  Till then, at least I can cross out one more thing off my Pinterest To-Do List.


August 8, 2012

Operation Classroom Paint

I would be happy to never pick up a paint brush again!  No, seriously! After two jam packed days of painting my classroom, I have fulfilled my need to paint for a good LONG while.

I promised pictures...so, here we go. 


This is what I walked into on day one.  The walls look so much better in the picture.  As I mentioned in a previous post, the blue wall was horribly faded.  Can you see it? I can see hints of it, but then again... I know what I'm looking for. And the green wall was just...very...green.

This is another shot of before from a different angle. Don't you love how everything gets piled in the middle of the classroom?  You can also see those icky accordion wood doors that are my other 2 walls. It is open right now, so you can also see some of the hallway (behind the exit sign).

And, now my classroom looks like this!

I love the blue, but there wasn't enough paint to do both walls. Bummer, huh? But teachers are nothing if not flexible, so I used the tan color that was just repainted in our halls. (See previous picture.)


Here is a close up of the walls so you can see the colors.  What do you think?  I'm really happy with the way it turned out.  It is much warmer and calmer. I'm thinking about adding several lamps with soft lighting too.
 
No time for furniture rearranging yet, but today I will touch up paint and start playing with the furniture.  I'm trying not to get ahead of myself with my to-do list, so for now it looks like this:

1) Touch up paint
2) Rearrange furniture
3) Rescue personal furniture from storage unit
4) Rearrange furniture again
5) Unpack boxes

When I finish this list, THEN I can start thinking about bulletin boards and getting ready for the kids.  Small steps.  I've got to take small steps.  

I can hear Dory in my head.  

Just keep swimming!


August 6, 2012

DIY Pinterest/Blogger Inspired Made-Its!


First, thanks to everyone who commented on my last post about classroom wall color.  Blue was definitely the most popular choice.  I can't wait to show you before and after pictures.  :)

So aside from school starting in now 14 days (yikes!), my husband and I are still in that moving in and getting settled stage of our house, so... we've. been. busy.

On Saturday we braved Ikea.  Seriously, that place is a nightmare on a Saturday.  I did, however, get another bookshelf for my office and my husband found a desk for his office. He very sweetly put my stuff together first, so I'm all good to go while his desk is still in boxes.  He's so sweet!

Sunday was full of yard work and other odds and ends around the house.  This homeowner thing is really wearing me out but I love it all at the same time too.

Luckily, I did have a chance to get a few crafty/school things accomplished this past week. So, I'm linking up with Tara at 4th Grade Frolics for Made-It Monday.

First, I should tell you that I am completely obsessed with all frames turned into dry-erase boards.  I made my first one several weeks ago for quotes of the day, and now I can't stop imagining all the possibilities. Hobby Lobby was having 50% off all frames sale, so...

I made myself a menu board. Here's to hoping I use my menu board and stick to my healthy eating plans.


Then, I made myself a to-do list for my desk at school. Krisin from iTeach 1:1 used a similar frame for her menu last week and I loved the idea. Easy wipe on/wipe off - love it!

 Obviously, I have a lot to do.  :)

Then, I printed out and laminated the super cute class journal prompts from Fabulous Fourth Grade Froggies and made...duh...my class journals. I decided to start my year off with 5 journals and add to my collection throughout the year.

Click here to go to her post and get your own free journal covers. Thank you so much Lorraine!

Next, I printed and laminated the Morning Meeting Activities cards from Mrs. Bainbridge at Mrs. Bainbridge's Class.  If you do morning meeting, this is a great resource!  It is so easy to flip through the cards and find/remember different fun activities.  She also has a collection of greetings for free download too.  I'm working on getting those cut out and hole punched. To download your own free copy, click here!


Finally, I enjoyed my happy birthday bookmarks so much, I decided to do a back to school version. I made a set for my own class and for a fellow teacher that won a giveaway at Soaring Through Second Grade


Didn't they turn out cute?!  I think the school bus is my favorite, but I love them all. I'm not sure how much the boys will love the red polka-dot ribbon, but I thought it was too stinkin' cute not to use. 

I was thinking about doing a set of bookmarks in a giveaway on my own blog.  Would y'all be interested? Let me know please.


Want to check out even more great crafts, projects, and school made-its?  Head on over to 4th Grade Frolics to follow and/or join the party.  There is a plethora ideas and just a few weeks left in summer to get it all done.

Happy crafting! I'm off to paint!


July 23, 2012

DIY Happy Birthday Bookmarks

Guess who got a little crafty this past week? Yup, you guessed it.  Me!

I'm so proud of myself because I accomplished two project this week and I didn't use hot glue for anything!

My first project comes from my own brain.  What?!? I'm not claiming it to be an original idea, but I am claiming that I did not see it on Pinterest first, so it feels somewhat original.

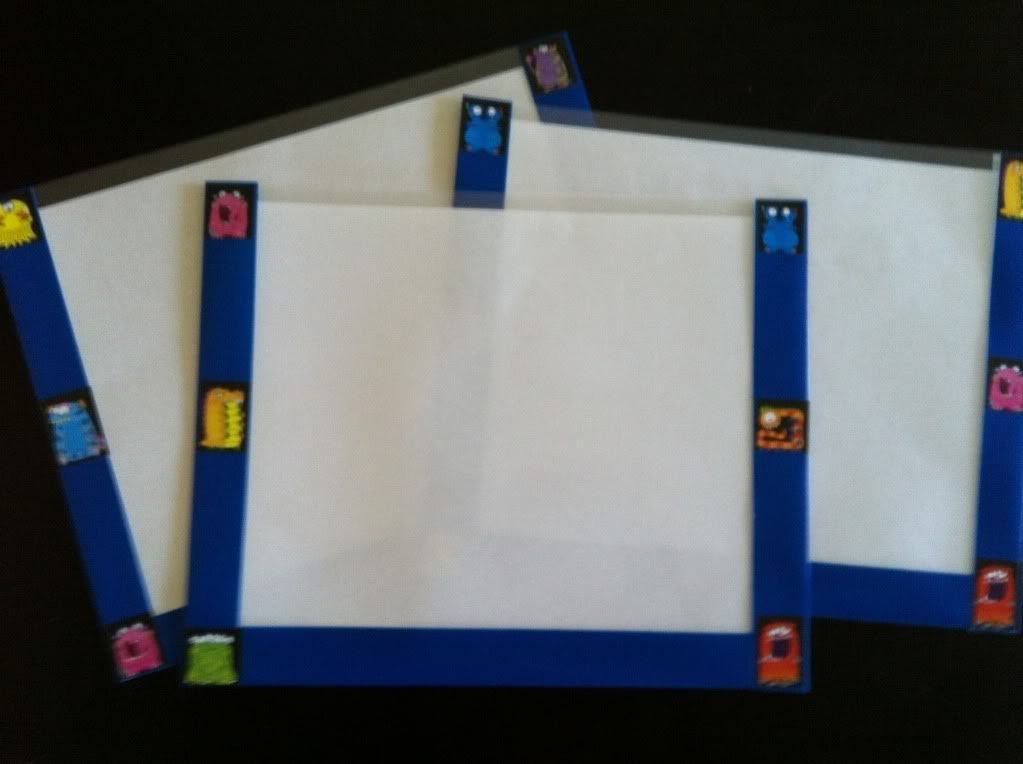
Check out my birthday bookmarks!!


I loved the idea of having something special student birthdays.  I knew if I tried to pull something together mid-year it would NEVER happen.  So, I had to get it done now. The kids at my school already get a pencil from the office, so I went with a bookmark (so me!) and I'm really happy with how they turned out.

I made three different styles of bookmarks using three pieces of scrap-booking paper. I decided to use scrap-booking paper because for less than $2 I save my printer A LOT of ink.  Plus, my inkjet can smear and that just looks tacky!

I also grabbed 3 sheets of the black happy birthday paper for the back of all the bookmarks.  This way the bookmarks would be two sided.

The steps for this little creation are quick and easy.

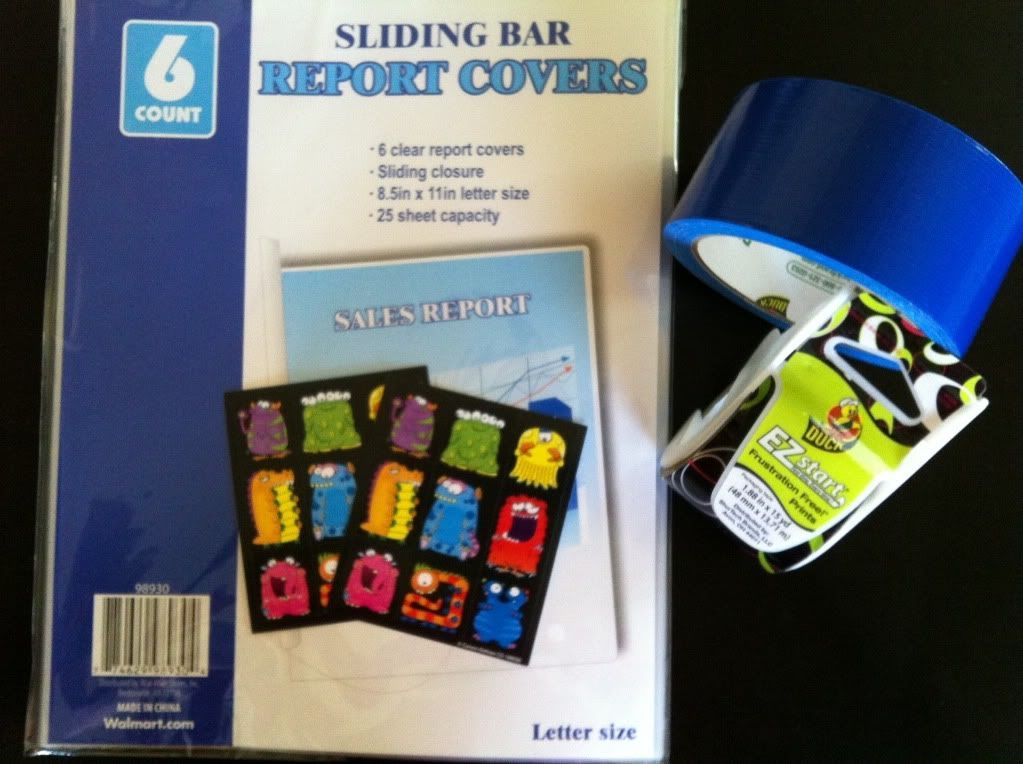
First, cut the paper to fit in your laminating pouches (8.5 x 11) if needed.

Then, I glue the scrap-booking paper together to create a front and back. My experience has taught me to make sure you use plenty of glue and let it dry ALL THE WAY before you try to laminate.

Next, laminate those puppies!

Finally, cut out your desired bookmark size.  I found I could easily get 8 bookmarks per sheet that were 2 inches wide and 5 1/2 inches long. Go to town with your hole punch and add a cute ribbon for the finishing touch. 

Didn't they turn out cute?!? It was really easy and I had a lot of fun "crafting."

Then, this morning I found this cupcake-ilicious cookie jar and thought it was just the right size for my birthday bookmarks.


 I mean...how perfect is that?  Hooray!

My second project was very spur of the moment.  I was walking the aisles at Michael's, saw a frame at a good price, and viola...
I made one of those super cute quote of the day frames for my classroom.  I choose really basic paper for the background and I already had some black scrap-booking letters left over from my guided reading folder project, so I went for it and I LOVE it.

I now completely understand why versions of these frames are all over Pinterest. It took me probably 5 minutes to complete and I know it will be a wonderful addition to my classroom.

If you have been considering making one - do it! They really do turn out super cute and are so easy.  Now, I'm thinking about making a menu board for my kitchen.  Wouldn't that be cute?!?

I'm also in the process of collecting quotes for my board and will share as soon as I compile an adequate list.  If you have a favorite quote, I'd love to hear it.  Please comment below and I will add it to the list before sharing with everyone.

Now, I'm linking up with Tara at 4th Grade Frolics for Monday Made It.  Be sure to stop by her blog to link up with your own creations or troll for more good ideas.  Happy Crafting!

July 17, 2012

DIY Pom-Pom Erasers

Hello, my name is Amanda and I am a Pinterest addict.  Hi Amanda!

It's true.  Since joining the world of Pinterest, I can't get enough.  There are so many ideas to steal borrow.

I have tried my hand at a few crafty things, but that is not really my forte. Many of those projects are simply out of my league, but if it can be accomplished with a glue gun and and glue gun only, I'm ALL over it!!

One of the most brilliant and simple ideas I have seen is the pom-pom hot glued (woot! woot!) to a dry erase marker.  Seriously...genius!  It's a built in eraser.  Why have I not thought of this before?


I took the dry-erase markers from Staples (remember the ones that I paid close to nothing for?!?) and went to town.  It took me a whopping 15 minutes.  Glue, pom-pom, hold!  Very complicated directions. 


I'm stoked about how they turned out.  I love the black marker with bright pom-pom!

I plan on giving each one of my students a marker with pom-pom during the first week of school.  I will add student names (via printed labels) to each marker to personalize and students will be responsilbe for keeping track of their own dry erase marker.

If a new eraser is needed, well then, I'll just bust out my glue gun and go to town right then and there.  Y'all keep a glue gun in your classroom too, right?

Hmmm... what else can I do with just a glue gun?  Ideas?  Please comment below.

July 10, 2012

DIY Dry Erase Boards - Easy and Cheap!

Happy Monday peeps!

I finally have working internet at my house and I couldn't be happier.  As the Time Warner guy carried my laptop into my kitchen I screamed, "Is that Google?!?" and ran to take possession of my computer.

It's been a busy week moving in, painting my study (love the new color!), and getting organized enough to have house guests.  Yes, house guests!! Two of our best friends from Seattle came to visit on Friday, so the whole week has been a whirlwind, but so much fun. I love having my friends in town.

I should be in bed, but I wanted to link up with Tara for Made-It Monday really quick. So, without further ado...here are my DIY classroom dry erase boards!!


I saw these on Pinterest (I know you have too) and I HAD to try them out.  Supplies are easy - sliding bar report covers, duct tape and/or colorful packaging tape, and I added stickers. 


I bought the plain blue duct tape because I got more duct tape for the money. Then I added some cute monster stickers to brighten it up and make them a bit more fun.  Of course, you can just use the super cute stuff to begin with, but with hubs standing right behind me when I bought supplies I decided to be more cost conscious.  :) 

I could walk you through the steps, but Charity over at Classroom DIY has video instructions and what could possibly be better than that? I just going to leave the step by step directions to her. Thanks Charity!


After playing around with them for a day, I decided that these things are awesome! 

I was really impressed with how well they worked. They were easy to wipe off...even if I left the marker on there for a bit.  Yes!

Total cost for supplies was about $20 and I bought enough to make 18 boards with duct tape left over.  Talk about a great deal AND it didn't take me long at all. It was a great excuse to sit down and watch some TV.  I was working. *wink, wink*

I plan on using keeping these dry erase boards with all my guided reading materials for students to use while in small group.  This way I can fill the slips with blank paper or a graphic organizer for them to use while we read  AND since I have so many extra boards that take up virtually NO storage space,  my students can work on them continuously throughout the week, no problem! (You could even use different colored duct tape and/or stickers to differentiate your groups. Brilliant, right?) 

So, there we have it.  My version of the quick and simple DIY dry erase boards.  Isn't duct tape amazing?  It just accomplishes so much.  Between the duct tape and my glue gun, I think I could do anything.

Don't forget to check out other great projects and share your own with Made-It Monday at 4th Grade Folics. Happy crafting!

June 25, 2012

Super Cute Teacher Clipboards

I love scrolling through my reading list and seeing all the Monday Made It buttons.  Everyone has caught the fever, including myself.  Thanks Tara for hosting such a fun weekly linky party.
First, I made the super cute clip boards that I know you have seen ALL over Pinterest.  Hello bandwagon.  I'm Amanda and I'm hopping on!  :)

Here is how mine turned out.  I bought the paper by single sheets at Micheals and had a lot of fun choosing colors and designs.  I'm not really the craftiest person on the planet (as evidence by the fact that I do not have cute scrapbooking paper on hand), but I gave it a whirl. 


I have a few bubbles here and there as it was my first real go with the Mod Podge.  But, overall I'm excited about how they turned out. Ready for the close ups?  Can you see the bubbles and maybe a few other small tears? Oops!

 
I think the best part about these new clipboards is that I will be able to spot them on my desk.  They won't blend in with all the other paperwork and other random things.  Somehow, someway, my desk is ALWAYS trashed at the end of the day and I mean it is covered in...in...well, I'm not really sure exactly...everything.  Now, at least my clipboards with important paperwork will be like a guiding light as I go through the daily task of straitening, organizing, and getting my life back together in general.  :)

Anyway...

I spent the rest of my week making my house look very bare and making my guest room look like a storage unit.


We are pretty much all packed up. I have stacks of boxes strategically placed throughout my house and I'm eating off paper plates for the week, but I'm so excited to get on with this move. Cross your fingers that nothing happens and we close on our house this Friday.  That means Saturday is moving day. Woot! Woot!

In the midst of all this craziness, guess what?  My dog goes outside to play ball for, seriously like 10 minutes, and the pavement is TOO hot! He burns his feet and I mean, HE BURNS HIS FEET! The pad on his left front paw blistered up and was peeling off his foot.  No good. He earned himself a trip to the vet and a round of antibiotics.

They wrapped his foot and told him to stay on the grass.  Plus, he was forbidden from playing with his ball which is like his reason for living. It was so sad. As you can see, he didn't leave my side.  I'm was stalking reading blogs, while he sat right there next to me...looking pathetic.

I'm happy to report that they removed his bandage Friday and he's back to his happy self.


We learned an important lesson though.  Texas pavement is HOT and it is really HOT to a dog that grew up in Seattle and apparently has delicate paws, so keep your pups safe and keep them off the hot pavement during the day, especially this week in San Antonio when we are expecting temperatures in the 100s.  Yowza!

Finally, if you are not linky partied out, don't forget to join Fiction Friday: A Celebration of Children's Literature.  You can join anytime during the week, I just choose Friday because I'm a teacher and I like alliteration.


Only three people have linked up so far this week (insert super big super sad frowny face) but I have already heard about so many new great books (insert super big super smiley happy face).  So come on over and join the fun.  Why not make Monday a two for one linky special?  I give you all permission to write 2 posts.  I can't wait to see what you have made and what you've been reading!